Top 6 Tips on How to Design a Vintage Airstream
There is no one way to design anything but I hope to share some of my tricks and tips I've learned over the years to make your design a bigger success. These are based on my training as an architect so take that into account. Some of these are basic and fundamental methods which you may or may not apply to your project. But in the end, the more work you do on paper (or on computer) ahead of time for sure the less headaches and issues you will have on your renovation project. This won't solve or cure all of them - it is a renovation - something will come up - but it will prevent some small and/or major mistakes from coming up down the road.
Tip #1: Measure the Airstream before you Design- this one seems pretty basic but the idea here is don't spend too much time on the design until you can actually measure the Airstream you will be renovating. The idea here is going off of online floor plans is ok for a general start, but without exact dimensions of your Airstream, you really won't know exactly what you can and can't do without being inside your own. The window locations may be slightly or all-together different. You never know but you want to be sure you are designing for your particular Airstream so you know if you put the bathroom in that location you might have to do X or Y or Z. You might find out "I really want to put the bathroom in location A but I will have to move two windows and that isn't something I want to do". So rule #1 - once you get your Airstream gut it out and measure everything inside from top to bottom to scale to the nearest 1/4". This leads me to tip #2...
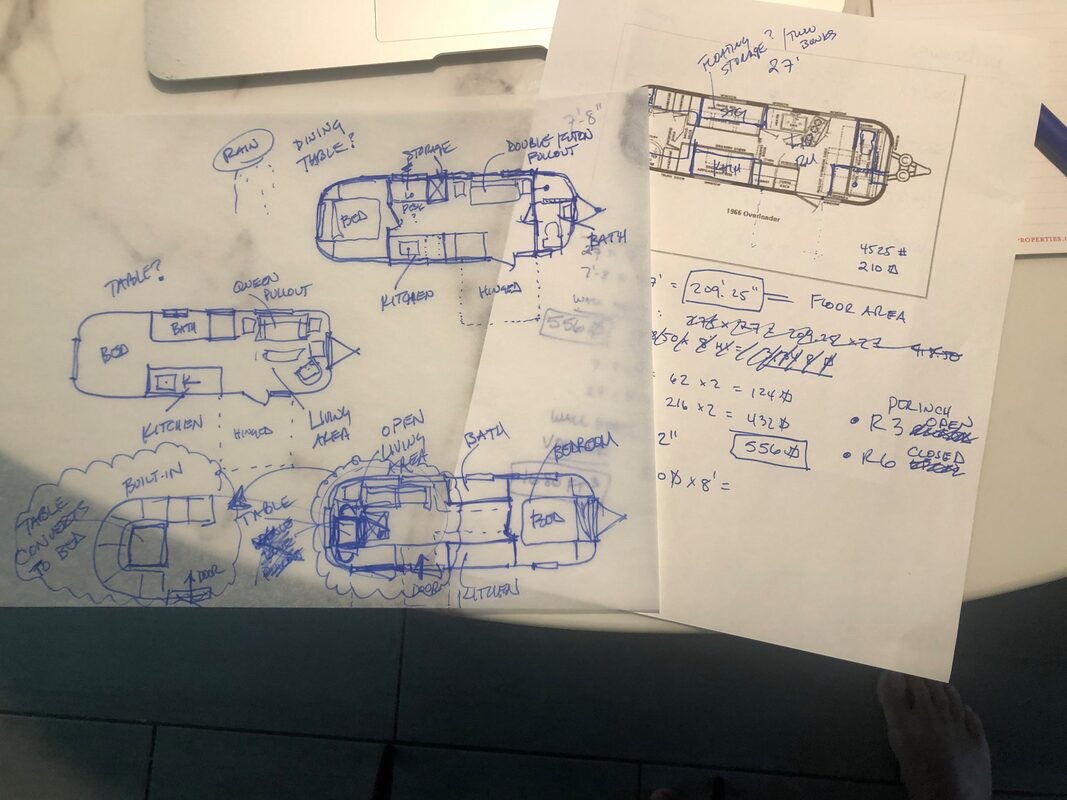
Tip #2: Scale it on Graph Paper: Once you get the measurements of your Airstream, download or buy some graph paper to 1/4" scale like this one. Tape it to a table or desk and figure out approximately how many feet in length your Airstream is and decide if you need one sheet or sometimes it works with two taped together. The point is you want this drawing to be to scale so 1/4' on the page is equal to one foot in the trailer. 1/4" to 1' exactly. Now you will know if that queen bed you're thinking of putting in will fit or not, or the kitchen layout or whatever. Now buy some tracing paper (see through and cheap) and start playing around with layouts. Be sure to research what has been done in the past before re-inventing the wheel and see what works with your needs. Sketch sketch sketch. Go nuts! It is a lot easier and cheaper to try ideas on paper than it is to start and change things later. Iterate and test and begin to reduce the options to one or two. Then once you have one or two layouts. Go look at it in the Airstream and see how it feels. In fact you can do this as you test your design ideas. Some things look super huge on paper even to scale but once you get inside the Airstream it will not look so big. You might also try using cutouts (to scale) of furnishing you know you will be adding like beds, sinks, toilet, couch, etc. You can move those 'pieces' around based on your different layouts and see how things layout. For
Tip #3: Prioritize your Needs: each trailer user has unique needs for their own particular needs and wants and style. You may be using the Airstream for only 2 adults whereas someone else might be trying to work around a 4 or 6 person use. Some want a big bathroom space and don't care about the kitchen while others will be the opposite. Do what you need for your use but remember you may be selling this one day so keep in mind the general needs of the population of Airstreamers before making your final decision. In the end, this is yours and you should make it your own. Research forums and conversations from other experts of experience and learn and be open to what others have done and how it might be adopted to your designs. There is not a lot of space so each design decision should be carefully considered but don't over think it. You won't ever finish. Just make your best guess for where you are at right now and go for it! You can always change things with a renovation in the future or sell and do this again!
Tip #4: Match the Trailer Structural Frame with your Design: depending on who extensive your renovation is, you have to take careful consideration into the structural supports of the trailer, both sub-floor supports and behind the skin supports. If you are pulling up the sub-floor and doing work on the trailer, you will have access to the exact layout (or you can remove the belly pan and investigate from below). The general layout in most trailers for the sub-floor and wall/roof system is on a 24 inch on center layout. So lets say you want to add a bathroom that ends up with the toilet flange sitting exactly 72 inches from the back wall. Well, 24 inches times 3 is 72 so this means you are designing something that is going to require a structural adjustment in the framing. Not impossible, but not something that will work within the existing layout. Same concept with moving a window or door. It is possible but you just want to be ready for that when designing. That brings up the point too - don't feel TOO constrained by the windows or even the door. You can move a window pretty easily or even just remove it entirely or add one. Any remodeler of homes or trailers will be open to the idea so you should too!
Tip #5: Tape it Out: Finished with the general design? Go buy a roll of blue painters tape or some other mastic tape and grab your tape measure and plans! Transfer your design onto the trailer floor and try and imagine the space. You can even use the tape to go "3D' and tape from floor to ceiling the walls so you can begin to 'feel' how the space would be. Some people can visualize better than others so do whatever you need to do to see how the layout works. Try different iterations too. The cost and time it takes for this is nothing compared to assuming the plan will work out in real life and then only to find out it won't. Now, don't get me wrong, things will go wrong because they almost always do in renovations but that is part of the fun too. Problem solving issues as they come up. However, having a good solid plan before starting the project is the safest and best way to assure a successful renovation.
Tip #6: Spec out Your Finishes: When finalizing the floor plans you are probably focusing on the walls and built-in benches however it is really best to also 'spec' out (spec meaning 'specification') exactly what products you will be installing or using in your Airstream renovation. Architects use what we call "Schedules" for the doors and windows, the finishes etc. Basically it is a spreadsheet of the finishes with an identifying name ("Door 01") and manufacturer and size. Now given there may be only one door (the bathroom) and the windows are already included in the renovation you probably won't need to create a window schedule BUT I would recommend researching and deciding on some other finishes. What toilet are you using? That could make a big difference on the success of your bathroom layout. Same with the cabinets and sink. Even the faucet could impact the design - if you had a tall faucet but a short curved wall or a low upper cabinet that could pose a problem. Spec out the water heater, the electrical box, the heating and cooling too. What kind of flooring are you using? How thick is it and will it match the bathroom flooring? Even a 1/4" difference might change how you approach the project. If your main flooring is 5/8" thick and your bathroom flooring is 1/4" think, you will want to consider how you are going to fill that 1/8" gap to make the seam a professional perfect match. Roof mounted air conditioner? No problem but what if you wanted to install a light in the same location? Designers will create an electrical layout including location of switches and lights and any other systems including the location of the fuse box. A plumbing diagram should be done as well. Nothing fancy- just a stick figure diagram showing where things are going to start and end. Your water tank locations are limited by the structural system of the trailer so be sure the waste piping can work before you get started. Creating a big spreadsheet with each detail would help not only the design but when ordering you can use the list for researching and finding your supplies. You can even get fancy and add a timeframe for deliveries. Some projects may be in stock and others make take weeks. You will want to see and know that ahead of time so your project can run smoothly (or smoother!) Ideally you will want to do as much of the decisions like this upfront as you can. Believe me it will save lots of time and aggravation down the road. This would help too if you are subcontracting any work out so they can see exactly what is going into the trailer and where.
Now having said all of this, most of you are saying - this guy is over the deep end. Let's just wing it! I totally get that and I've done it that way in the past. I am only sharing the professional standards an architect or designer would use when approaching the design problem. Maybe there are a few tips here that will help your project. In the end, it is your project and you are the boss. So good luck and have fun.
There is no one way to design anything but I hope to share some of my tricks and tips I've learned over the years to make your design a bigger success. These are based on my training as an architect so take that into account. Some of these are basic and fundamental methods which you may or may not apply to your project. But in the end, the more work you do on paper (or on computer) ahead of time for sure the less headaches and issues you will have on your renovation project. This won't solve or cure all of them - it is a renovation - something will come up - but it will prevent some small and/or major mistakes from coming up down the road.
Tip #1: Measure the Airstream before you Design- this one seems pretty basic but the idea here is don't spend too much time on the design until you can actually measure the Airstream you will be renovating. The idea here is going off of online floor plans is ok for a general start, but without exact dimensions of your Airstream, you really won't know exactly what you can and can't do without being inside your own. The window locations may be slightly or all-together different. You never know but you want to be sure you are designing for your particular Airstream so you know if you put the bathroom in that location you might have to do X or Y or Z. You might find out "I really want to put the bathroom in location A but I will have to move two windows and that isn't something I want to do". So rule #1 - once you get your Airstream gut it out and measure everything inside from top to bottom to scale to the nearest 1/4". This leads me to tip #2...
Tip #2: Scale it on Graph Paper: Once you get the measurements of your Airstream, download or buy some graph paper to 1/4" scale like this one. Tape it to a table or desk and figure out approximately how many feet in length your Airstream is and decide if you need one sheet or sometimes it works with two taped together. The point is you want this drawing to be to scale so 1/4' on the page is equal to one foot in the trailer. 1/4" to 1' exactly. Now you will know if that queen bed you're thinking of putting in will fit or not, or the kitchen layout or whatever. Now buy some tracing paper (see through and cheap) and start playing around with layouts. Be sure to research what has been done in the past before re-inventing the wheel and see what works with your needs. Sketch sketch sketch. Go nuts! It is a lot easier and cheaper to try ideas on paper than it is to start and change things later. Iterate and test and begin to reduce the options to one or two. Then once you have one or two layouts. Go look at it in the Airstream and see how it feels. In fact you can do this as you test your design ideas. Some things look super huge on paper even to scale but once you get inside the Airstream it will not look so big. You might also try using cutouts (to scale) of furnishing you know you will be adding like beds, sinks, toilet, couch, etc. You can move those 'pieces' around based on your different layouts and see how things layout. For
Tip #3: Prioritize your Needs: each trailer user has unique needs for their own particular needs and wants and style. You may be using the Airstream for only 2 adults whereas someone else might be trying to work around a 4 or 6 person use. Some want a big bathroom space and don't care about the kitchen while others will be the opposite. Do what you need for your use but remember you may be selling this one day so keep in mind the general needs of the population of Airstreamers before making your final decision. In the end, this is yours and you should make it your own. Research forums and conversations from other experts of experience and learn and be open to what others have done and how it might be adopted to your designs. There is not a lot of space so each design decision should be carefully considered but don't over think it. You won't ever finish. Just make your best guess for where you are at right now and go for it! You can always change things with a renovation in the future or sell and do this again!
Tip #4: Match the Trailer Structural Frame with your Design: depending on who extensive your renovation is, you have to take careful consideration into the structural supports of the trailer, both sub-floor supports and behind the skin supports. If you are pulling up the sub-floor and doing work on the trailer, you will have access to the exact layout (or you can remove the belly pan and investigate from below). The general layout in most trailers for the sub-floor and wall/roof system is on a 24 inch on center layout. So lets say you want to add a bathroom that ends up with the toilet flange sitting exactly 72 inches from the back wall. Well, 24 inches times 3 is 72 so this means you are designing something that is going to require a structural adjustment in the framing. Not impossible, but not something that will work within the existing layout. Same concept with moving a window or door. It is possible but you just want to be ready for that when designing. That brings up the point too - don't feel TOO constrained by the windows or even the door. You can move a window pretty easily or even just remove it entirely or add one. Any remodeler of homes or trailers will be open to the idea so you should too!
Tip #5: Tape it Out: Finished with the general design? Go buy a roll of blue painters tape or some other mastic tape and grab your tape measure and plans! Transfer your design onto the trailer floor and try and imagine the space. You can even use the tape to go "3D' and tape from floor to ceiling the walls so you can begin to 'feel' how the space would be. Some people can visualize better than others so do whatever you need to do to see how the layout works. Try different iterations too. The cost and time it takes for this is nothing compared to assuming the plan will work out in real life and then only to find out it won't. Now, don't get me wrong, things will go wrong because they almost always do in renovations but that is part of the fun too. Problem solving issues as they come up. However, having a good solid plan before starting the project is the safest and best way to assure a successful renovation.
Tip #6: Spec out Your Finishes: When finalizing the floor plans you are probably focusing on the walls and built-in benches however it is really best to also 'spec' out (spec meaning 'specification') exactly what products you will be installing or using in your Airstream renovation. Architects use what we call "Schedules" for the doors and windows, the finishes etc. Basically it is a spreadsheet of the finishes with an identifying name ("Door 01") and manufacturer and size. Now given there may be only one door (the bathroom) and the windows are already included in the renovation you probably won't need to create a window schedule BUT I would recommend researching and deciding on some other finishes. What toilet are you using? That could make a big difference on the success of your bathroom layout. Same with the cabinets and sink. Even the faucet could impact the design - if you had a tall faucet but a short curved wall or a low upper cabinet that could pose a problem. Spec out the water heater, the electrical box, the heating and cooling too. What kind of flooring are you using? How thick is it and will it match the bathroom flooring? Even a 1/4" difference might change how you approach the project. If your main flooring is 5/8" thick and your bathroom flooring is 1/4" think, you will want to consider how you are going to fill that 1/8" gap to make the seam a professional perfect match. Roof mounted air conditioner? No problem but what if you wanted to install a light in the same location? Designers will create an electrical layout including location of switches and lights and any other systems including the location of the fuse box. A plumbing diagram should be done as well. Nothing fancy- just a stick figure diagram showing where things are going to start and end. Your water tank locations are limited by the structural system of the trailer so be sure the waste piping can work before you get started. Creating a big spreadsheet with each detail would help not only the design but when ordering you can use the list for researching and finding your supplies. You can even get fancy and add a timeframe for deliveries. Some projects may be in stock and others make take weeks. You will want to see and know that ahead of time so your project can run smoothly (or smoother!) Ideally you will want to do as much of the decisions like this upfront as you can. Believe me it will save lots of time and aggravation down the road. This would help too if you are subcontracting any work out so they can see exactly what is going into the trailer and where.
Now having said all of this, most of you are saying - this guy is over the deep end. Let's just wing it! I totally get that and I've done it that way in the past. I am only sharing the professional standards an architect or designer would use when approaching the design problem. Maybe there are a few tips here that will help your project. In the end, it is your project and you are the boss. So good luck and have fun.